

Hello, it’s KA-TSU.
This time, I would like to talk about “What’s new about the Interval Composite” which I had pre-announced at the end of this article.
First of all, the most important thing; image quality.
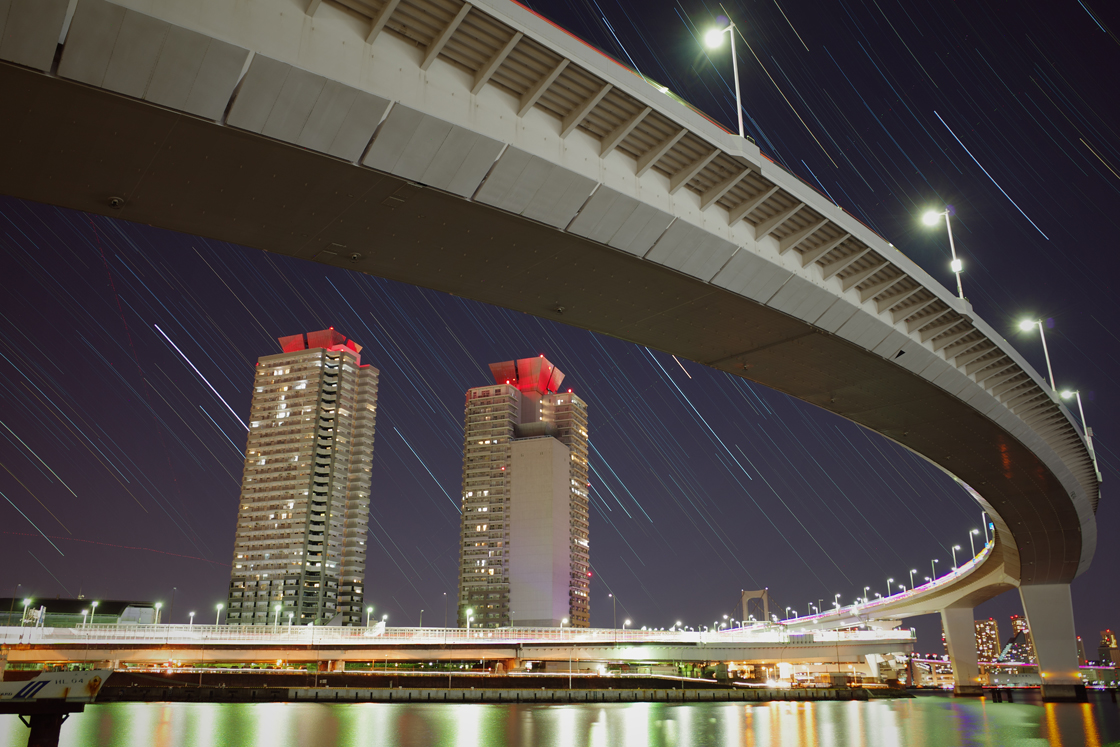
Take a closer look at the example used in “Expressive Power” of the GR III product page.
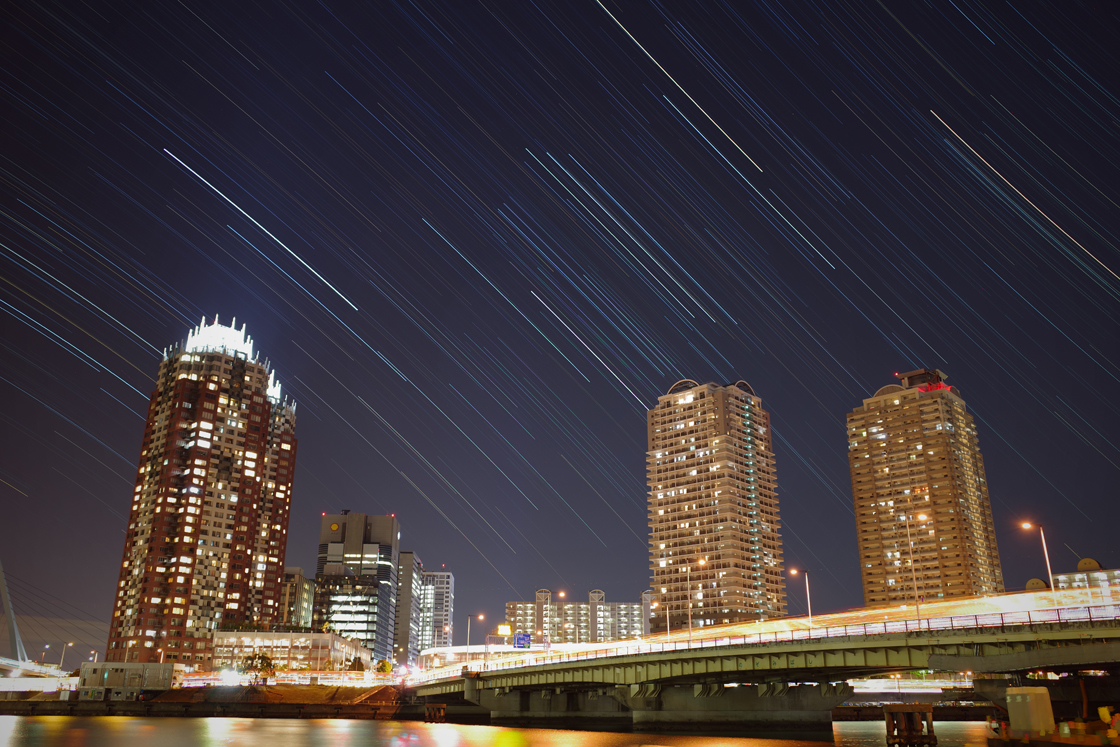
Light trails of 787 blended images (about 1 hour) ISO200, F2.8, 4sec, WB 4000K, AA Filter Simulator High
The first thing people who like stars would probably notice is that the colors of the star trails are good.
The Interval Composite was first installed in the GR DIGITAL IV, which was released in October 2011. It had a low pass filter and its color reproduction of the star trails was well.
The GR and GR II were equipped with an APS-C size sensor. Although the overall image resolution was improved by removing the low pass filter, color moiré was more likely to appear in the thin light trails against the contrasted background in terms of illuminance.
As an easing measure, the data taken by the interval composite had to go through the image processing to reduce moiré and that I think made the color slightly weaker when viewed as a whole image.
Please refer to this article[This is a Japanese article] for more information.
On the other hand, the GR III has a shake reduction mechanism that can reduce moiré by using the AA Filter Simulation. This enables to eliminate the need for special image processing to reduce moiré in images taken with the interval composite.
Both the star trails and the landscape are very well colored. If you set the AA Filter Simulation high, it will have the equivalent effect as having a reasonable low pass filter.
In addition, please look at the images of the lower left and right- the original image clipped in 1:1 ratio.
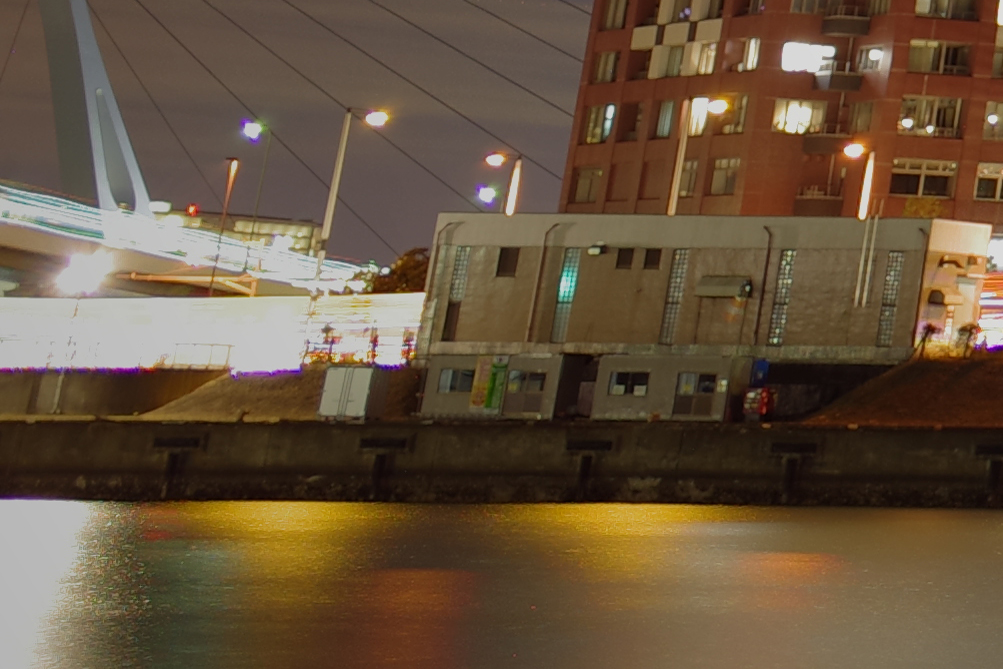
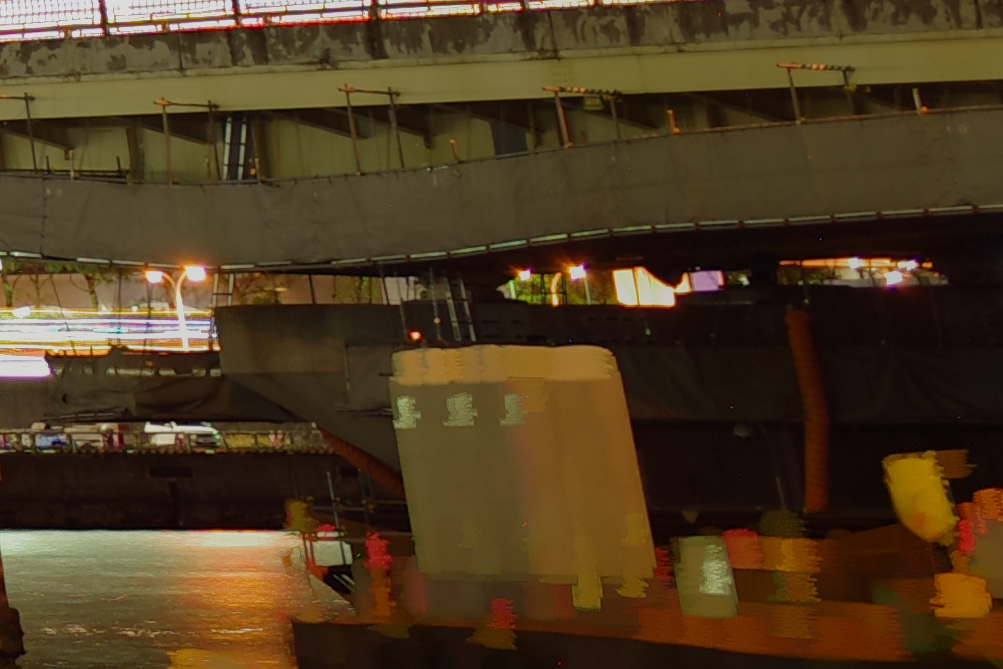
As you see, the GR lens makes a sharp image to the corners even when the aperture is wide open. As for the lower right, pay attention to the details of the bridge behind, not to the floats with load in the river swaying from side to side.
Next, how to operate it (how to recall the function and set the parameters).
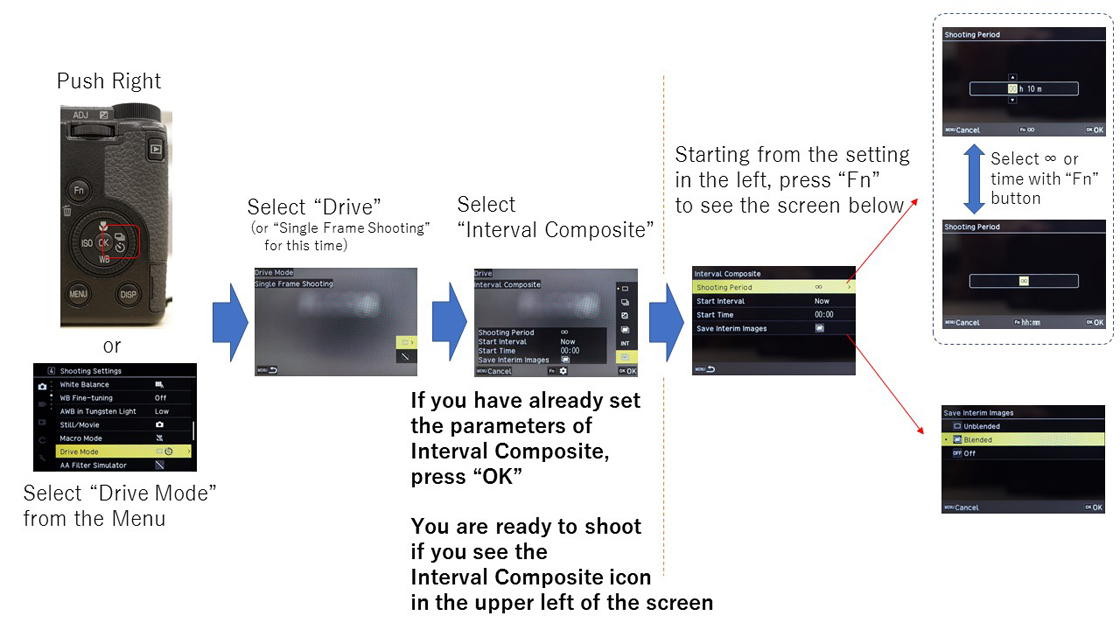
In order to select the Interval Composite, go to "Drive Mode" of the menu.
If you have not yet assigned any function, select "Drive” and press the right button." If you have previously set the function, select the “Drive Mode.”
Press OK if there is no parameter to change, and you can start shooting by pushing the shutter button.
There are the following 4 parameters for custom settings.
・ Shooting Period
・ Start Interval
・ Start Time
・ Save Interim Images (same as previous "Save Interval Composite Img" function)
The first thing we need to explain to you here is that we have omitted the "Interval" parameter.
The GR III behaves the same as the “Interval”→“Min.” of the previous GRs’ Interval Composite. This is to prevent an accident like "I could not capture the trace because I had set the interval wrong."
The interval composite function is now specialized in such situations as "star trails " and "lights of fireflies".
While one parameter has been omitted, another parameter has been added; "Shooting Period."
This is "the parameter to specify the time length to trace the light by 10 minutes."
If you had to specify the number of images, the value would differ depending on the shutter speed and it would be difficult to handle. So the length of the traces can be set by time.
In this parameter, you can also select ∞ like the previous GRs (manual termination or until the battery runds out).
The “Start Interval” and “Start Time” parameters work as a pair and are for more advanced users. Most of you do not have to change them.
Since the positions of the stars can be calculated in advance, this function is useful for those who can simulate from what time and how long you want to shoot in a specific location.
The "Save Interim Images" is the parameter of which we have changed the name.
But please be assured that what it does is the same as the previous models.
· Unblended (previously "Save Each Image")
→ In addition to the final image, all JPEG source images are saved.
· Blended (previously "Save in process")
→ In addition to the final image, all the JPEG images during the composite process are saved.
· Off
→ Only the final image is saved.
Please refer to this article and this article of the previous GR blog for how to use them.
[These are also Japanese articles]
Let me show you another example of the interval composite for a change.
Light trace of 578 blended images (approximately 44 minutes) ISO200, F2.8, 4sec, WB 4000K (M3A4), AA Filter Simulator High
I experimented how long it could shoot with one fully charged battery.
It depends on the exposure setting and temperature. Please make sure this is just as your reference.
・ Location temperature 21°C "No saving images", AA Filter Simulator High, F2.8 ISO200 4 seconds exposure setting → 2 hours 32 minutes 41 seconds (2026 images)
・ Location temperature 20°C "Blended", AA Filter Simulator High, F2.8 ISO200 4 seconds exposure setting → 2 hours 33 minutes 53 seconds (2039 images)
The image storage parameter seems to have little impact on battery life.
The next is the result of the experiment at low temperature.
Since it was already warm outside in spring, I left my GR III with a battery in the refrigerator for about 45 minutes with the power off and then went out for shooting.
・ Low temperature 10°C "Blended", AA Filter Simulator High, F2.8 ISO200 4 seconds exposure setting → 2 hours 18 minutes 43 seconds (1825 images)
Compared to the location temperature, less shots were taken. It's still over 2 hours though.
It could be painful to compare it to the GR and GR II because they had extremely good battery life (in one case, it could last for 5 hours and 40 minutes).
In my opinion, it is similar to the battery life of a regular lens interchangeable type camera using interval shooting of comparative brightness composite.
If you really want to shoot really long...
It is only something I personally tried, but here is an example. PowerCore 10000 PD- a PD-compatible mobile battery Anker just released at the end of March.
The battery icon in the lower right of the rear LCD indicates that the power is being supplied.
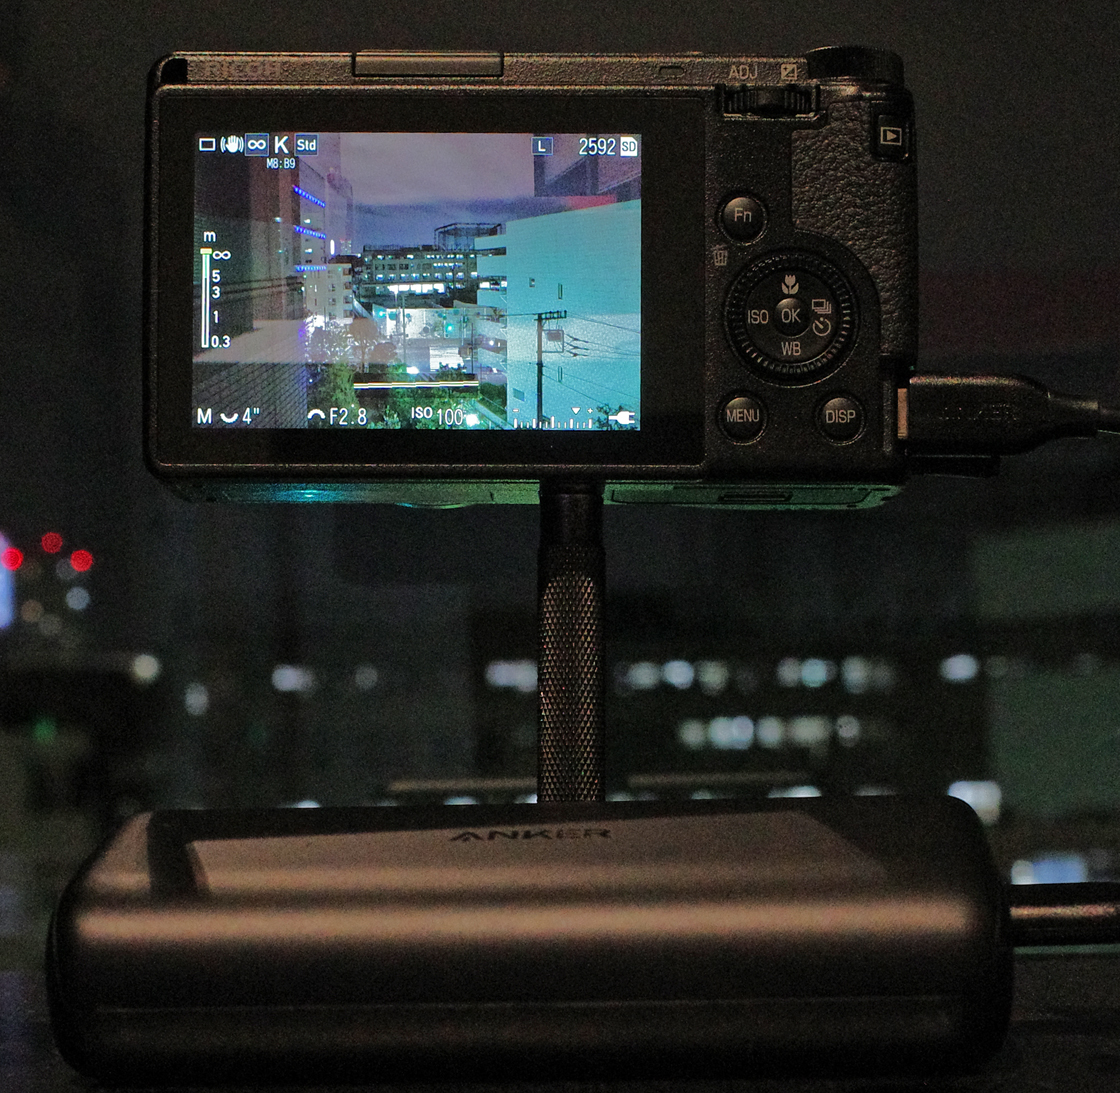
Please be aware that how to handle PD differs from company to company and there are cases where batteries behave differently according to the category within the same company.
This is just one working example for your reference.
(KA-TSU)


