

Hello, it’s KA-TSU.
We had so many typhoons this year and I understand many people are still suffering and experiencing inconvenience. I would like to express my sympathy and hope that they can return to their ordinary life as soon as possible.
Although I live in Kanto area, where we had relatively little damage, on the morning when the typhoon Trami passed by, it was my first experience that the partition of the veranda of our apartment house was destroyed and it was connected to the next door.
Since we had such a weather in September, I could not go out to take the starry sky, but I had some good results in July and August.
First of all, please watch this time lapse movie.
※ Please mind the volume of the music.
When you think of the night sky of summer, many of you may think of “Milky Way.” But, as for Milky Way in summer, the thick part extends form the south sky to the top. Even with the view angle of 28mm or the wider angle of 21mm of the wide conversion lens, the images tends to be monotonous or it can be hard to compose.
In such a case, you can have more variations of the starry sky by including other stars or changing the time to shoot.
Let me show you how I did for example;
"Turning stars in north" → "Starry sky photographed while panning from north to east" → "Milky Way in southwest" → "Stars setting in west"
I combined the images taken by turning around the camera’s point of view mostly horizontally clockwise.
Let me explain some more in detail.
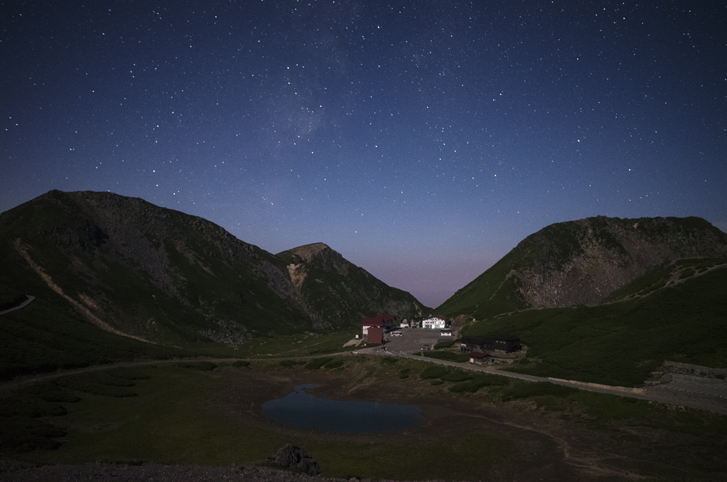
In summer, you can see the Big Dipperand and Cassiopeia near the ground in the north.
At the beginning of the time lapse, I used the wide conversion lens and photographed the north sky with the view angle of 21mm, but it was difficult to capture two constellations at the same time.
Some of you may have noticed that when I was panning to the right, one constellation can be balanced well with the landscape with the view angle of 28mm.
In the first half of the time lapse was a night with little moonlight, so it was difficult to make the landscape stand out.
However, with the moonlight, you can colorfully express the landscape with the starry sky.
M mode, ISO 1600, F 2.8, 20 sec
I shot this around 2:11AM on August 5. It was when the quarter moon was high enough to illuminate the area that was supposed to be the bottom of the crater and you could see many stars near the Milky Way in the western sky near the ground.
The process up to this state of light, which can be seen in the end of the time lapse movie, shows you how the image changes between with and without the moonlight effect.
And before dawn, winter constellations start to rise in the sky, where the boundary between night and morning is vague.
It is one of my favorite time zones in summer.
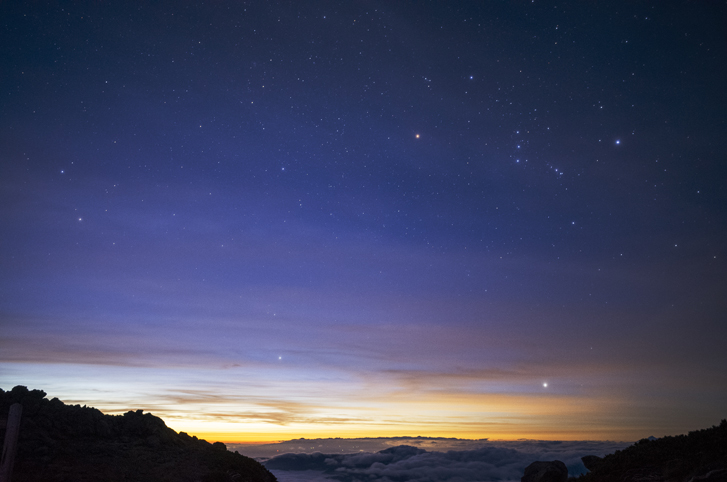
M mode, ISO 800, F 2.8, 15 sec
In the upper left corner of the screen there is the Gemini, the Orion of the summer in the upper right, and the Winter Triangle is near the center.
From autumn to winter, these lively constellations gradually rise earlier night by night and will eventually become visible in the deepest hours of the night.
This particular shot was not taken into the time lapse movie because it was a single shot.
In this post, I took summer for example, but you probably have understood that you can vary your images by devising direction, time zone, and size and height of the moon in any season.
By the way, the specs of GR III have been announced.
As a astrophotographer who likes to shoot in the darkness without moonlight, I’m interested in its high-sensitivity.
It doesn’t matter how high the rate can go. The actual picture quality matters.
The personal limit of the GR II’s high sensitivity was ISO 1600. How high can I raise with the GR III?
We are developing it now. Please look forward to it. I will severely review it as soon as it is finished.
It is also worth mentioning that it has the low pass filter selector and the longest time of the valve timer is 20 minutes.
In a dark place like the above mentioned, it is better to shoot star traces with one shot by exposing for 20 minutes than using interval synthesis (comparative light synthesis) because it can reduce traces decently and colors of stars are still visible, which I like.
I can’t want to test shoot with the GR III! Just like you, I am also longing for the GR III.
(KA-TSU)


