

(Translated from the original post on October 19, 2021)
Hello, this is KA-TSU.
The state of emergency was lifted in October, and for the first time this year, I was finally able to go out and bask in the light of the stars. I was blessed with good weather and was able to take some test shots of stars with the GR IIIx prototype! This article is a report with freshly taken photos.
By the way, when you hear the phrase "landscape photography with starry sky", you probably imagine "wide-angle," but there is one thing that the GR IIIx excels at in this genre with its 35mm equivalent angle of view of 40mm over 28mm.
Now, let us compare the difference in angle of view between the GR III and the GR IIIx.
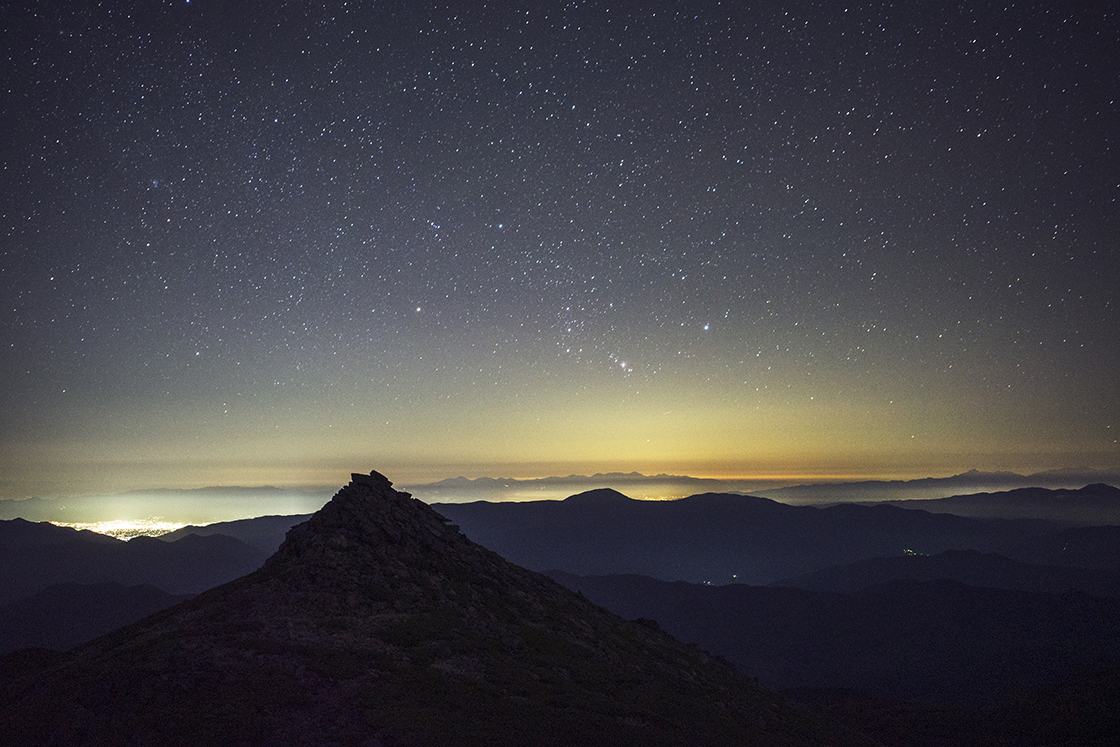
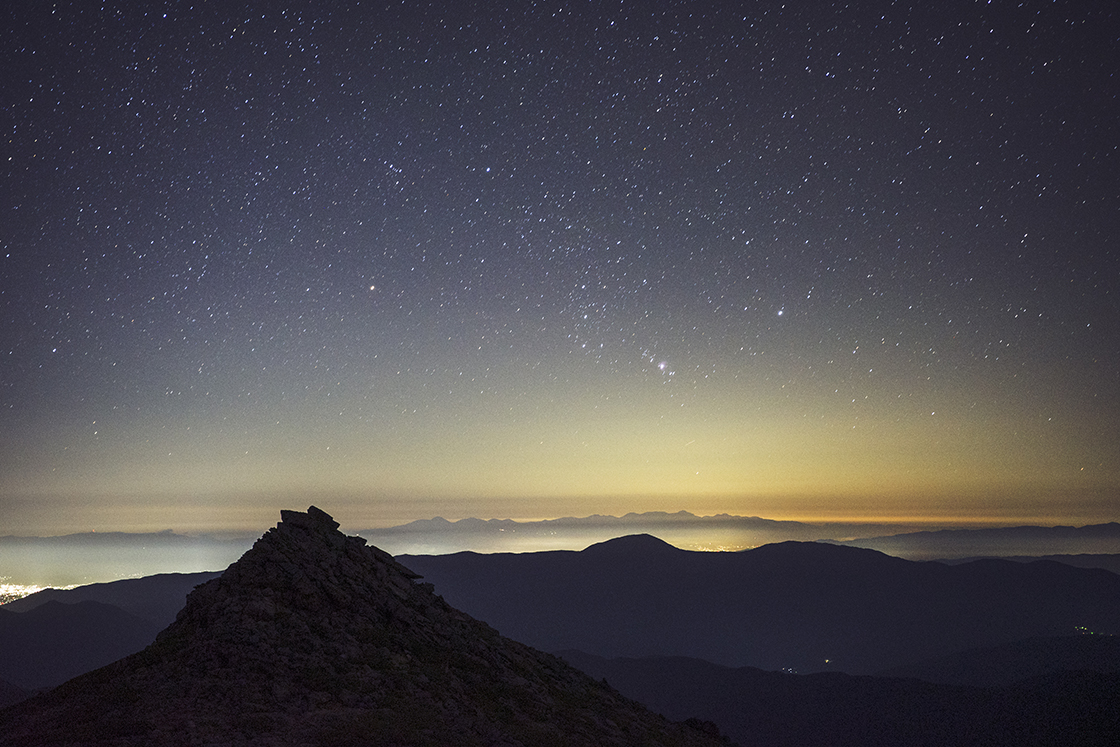
Both had the low-pass selector set to strong, image stabilizer to off, the exposure at f/2.8, ISO3200 and 25sec, and the tone curve and colors adjusted in RAW development.
The GR III is on the left and the GR IIIx is on the right. Both were shot at f/2.8, ISO3200 with a 25-second exposure time, and the RAW development process was applied to adjust the tone curve and colors for astrophotography. When shooting starry skies, don't forget to set the low-pass selector to strong and the image stabilizer to off!
The bright triplets are lined up vertically in the center of the images. These are the central stars of the famous Orion rising in the sky from the eastern horizon. They form Orion's body and look like an hourglass or a ribbon (the bright stars near the horizon are not so bright in this photo due to the strong city light). The mountains in the distance in the center of the image are the Yatsugatake Mountains.
So, what does the GR IIIx do better than the 28mm in this genre?
It is to "make a famous constellation the main subject and capture the landscape at the same time."
Let's try one more constellation.
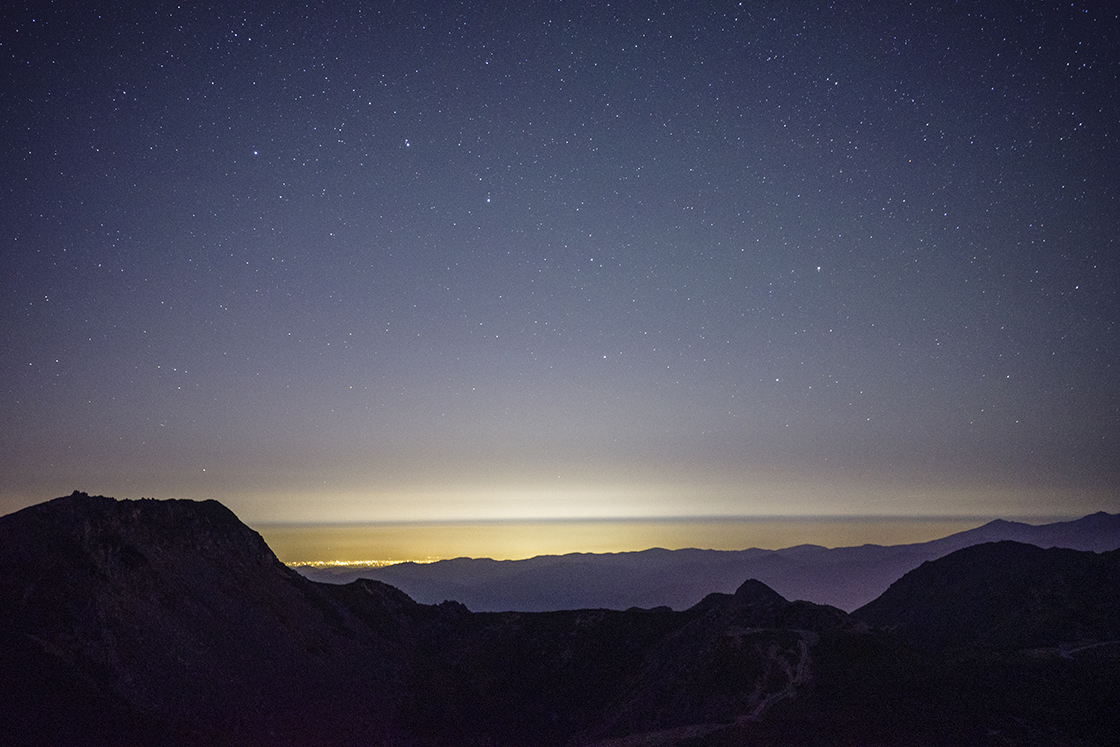
The low-pass selector set to strong, image stabilizer to off, the exposure at f/2.8, ISO3200 and 25sec, and the tone curve and colors adjusted in RAW development.
The Big Dipper lies slightly above the center of the image. It is up to you to decide whether to see the seven stars as a dipper or as a part of a bear. When taking this photo, I saw them as the Dipper. It can fit well in the frame as a part of Ursa Major, too.
Many famous constellations are known to fit in the 50mm angle of view. Since the human imagination has given meanings to the sequences of bright stars, it makes sense that they fit in the angle of view called a standard lens (There are some exceptions, though).
Because of this and the improvement in high ISO image quality of digital cameras, it has become possible to capture both the starry sky and landscape in a short exposure time even with a narrow angle of view, and more and more people produce works in this genre with long focal lengths now (I have seen a wonderful work of the Andromeda Nebula + landscape + portrait at a focal length near 500mm). The gap between astrophotography and landscape photography is disappearing, and you have more options in terms of angle of view.
For this reason, I myself have been taking landscape photos with starry skies at a 50mm focal length. I have noticed that, although it depends on the constellation, 40mm has better margins than 50mm. The 28mm is just wide enough to tightly fit two famous constellations, and too wide for one to be the main subject.
Even though the 40mm equivalent angle of view can capture both the landscape and a famous constellation as the main subject, it is still challenging to find a location where it is dark enough to clearly capture the constellation close to the horizon (meaning city light not too bright), the distant clouds do not interfere, and the weather is favorable at the same time.
In such a case, you can get the best results by placing a structure in the foreground and composing the image by looking up a little.

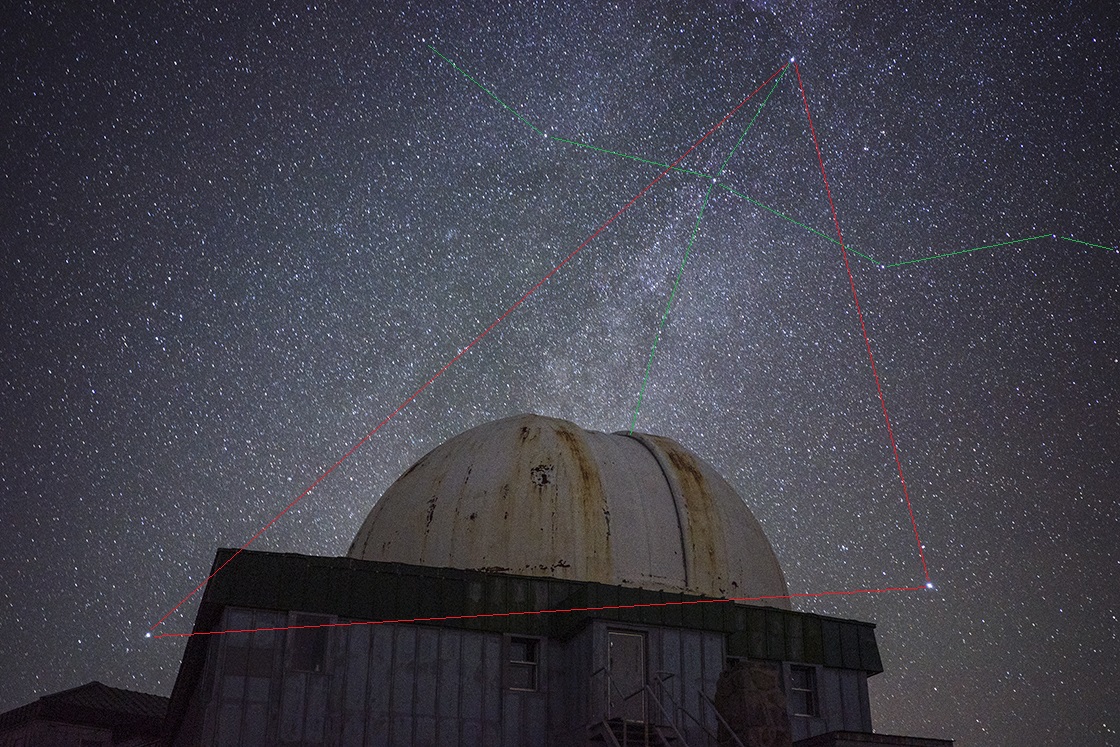
The low-pass selector set to strong, image stabilizer to off, the exposure at f/2.8, ISO3200 and 25sec, and the tone curve and colors adjusted in RAW development.
Since it may be difficult for many of you to identify the constellations by text alone, I have included the constellation lines. The green is Cygnus and the red is the Great Triangle of Summer. The central part of Cygnus is also known as the Northern Cross. The image looks as if the cross is stuck in the dome. Shining brightly on the lower left of the building is Hikoboshi (Altair). Orihime (Vega) is at the lower right. Together with the swan's tail, it is called the Great Triangle of Summer.
I have included not only Cygnus but also the Summer Triangle in the image, but it is a bit too cramped to fit larger structures. As I said, the 40mm is ideal for capturing a constellation together with a scenery at a time.
In addition to the entire constellation, what if you include the central area of our Milky Way Galaxy?
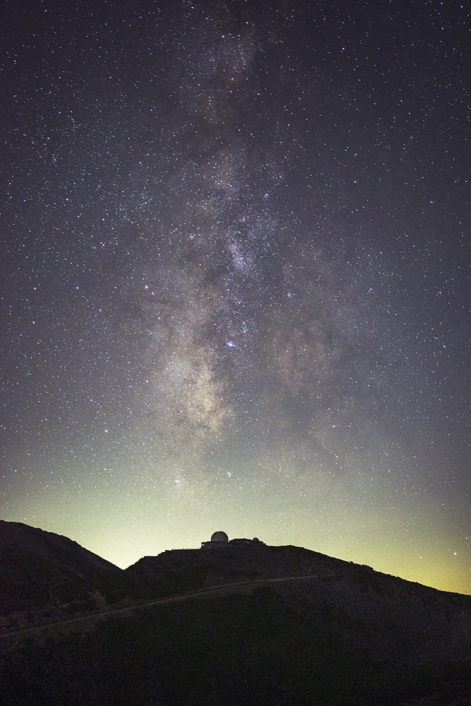
The low-pass selector set to strong, image stabilizer to off, the exposure at f/2.8, ISO3200 and 25sec, and the tone curve and colors adjusted in RAW development.
Although you may want to use a wide-angle lens to capture a wide area of the Milky Way, it is also nice to trim a characteristic part of the Milky Way like this. The Milky Way's center did not look as bright because there was strong ground light with no clouds to block it. But it emphasized the mountain ridges and the observatory instead.
Although the acceptable range depends on the person, and also on the print size and resizing for the web, the GR IIIx is a camera that you can enjoy casual snaps of the starry sky and landscapes just by fixing the camera position. But it is undeniable that 25-second exposures at a 40mm equivalent angle of view results in noticeable starbursts on large prints. Although the camera works to the limit of what is currently possible for a camera with an APS-C size, 24-megapixel sensor, it would be more favorable, based on the kinds of photos I'd like to take, if it had improved high ISO performance in order to increase the shutter speed by one more stop.
A last little topic: October 21, 2021 is the 10th anniversary of the Interval Composite function in the GR DIGITAL IV! I remember that the GR DIGITAL IV was probably the first commercial product that enabled comparative brightness compositing for star trails within a camera.
This function was originally intended to allow photographers to shoot star trails in bright urban areas, which is what we promote, but this time I took pictures in a dark place.
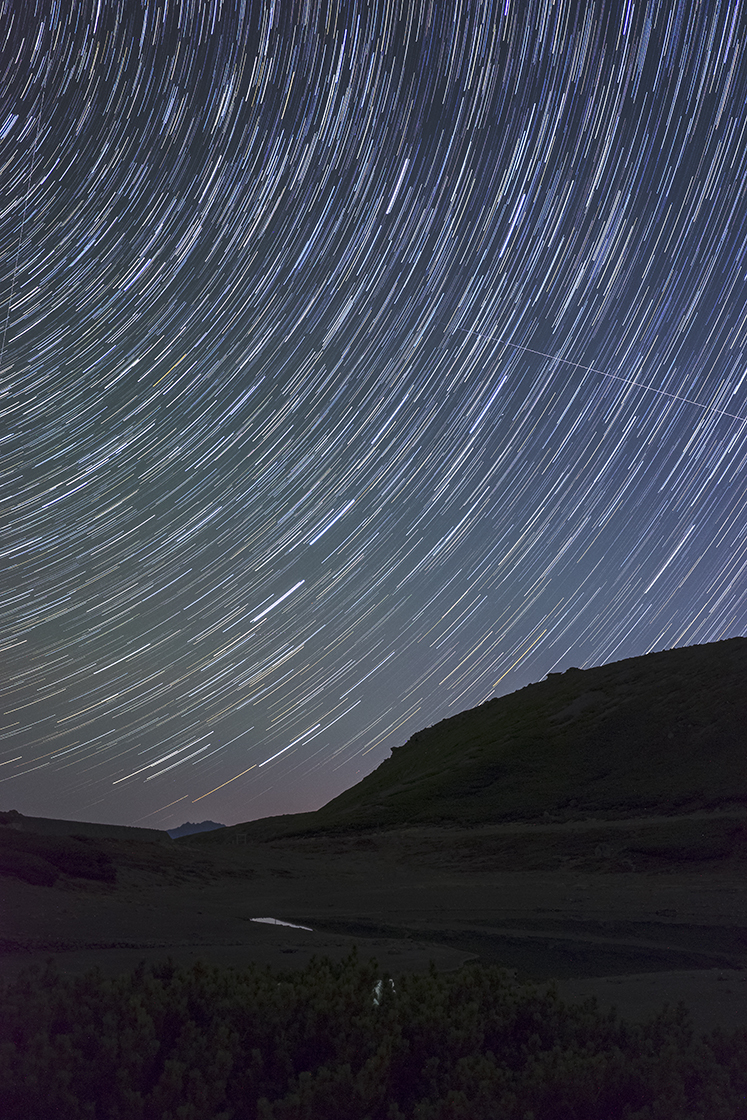
The low-pass selector set to strong, the exposure at f/2.8, ISO3200 and 25sec, and the tone curve and colors adjusted in RAW development. In the case of the Interval Composite, the image stabilization is automatically turned off.
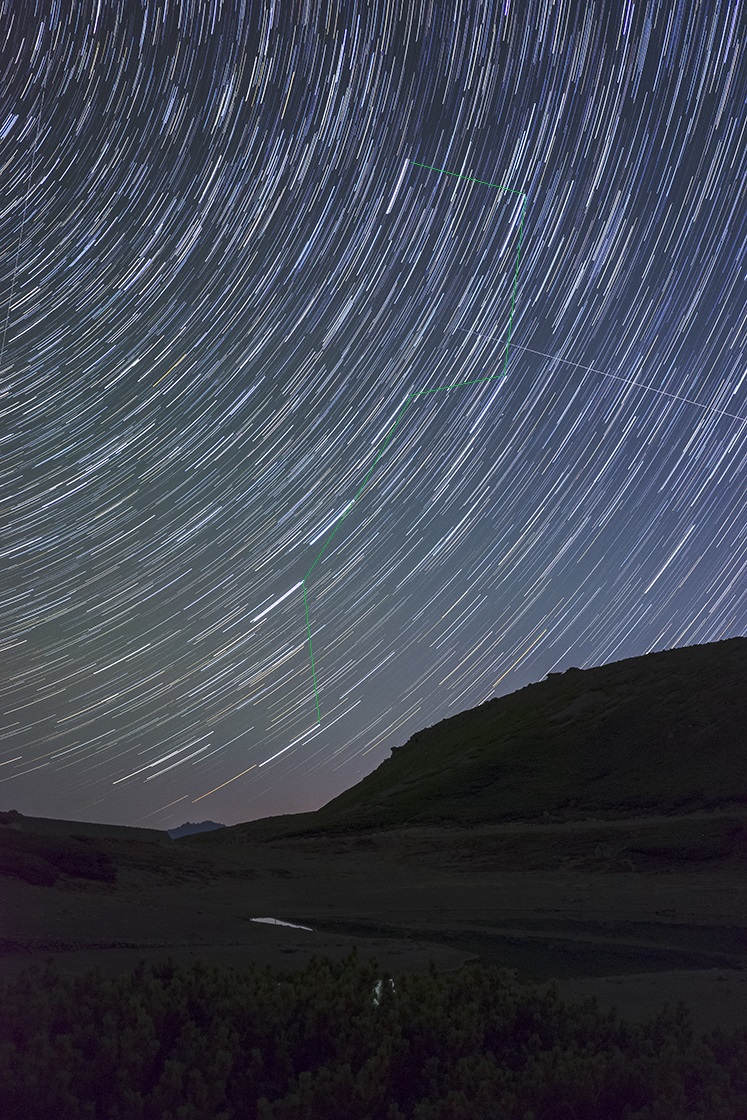
This is the light trace of the Big Dipper, which turned vertical at the end of the night. Since it's difficult to keep track of constellations when they are in light trails for many of you, I have included a photo with lines.
The low-pass selector set to strong, the exposure at f/2.8, ISO3200 and 25sec, and the tone curve and colors adjusted in RAW development. In the case of the Interval Composite, the image stabilization is automatically turned off.
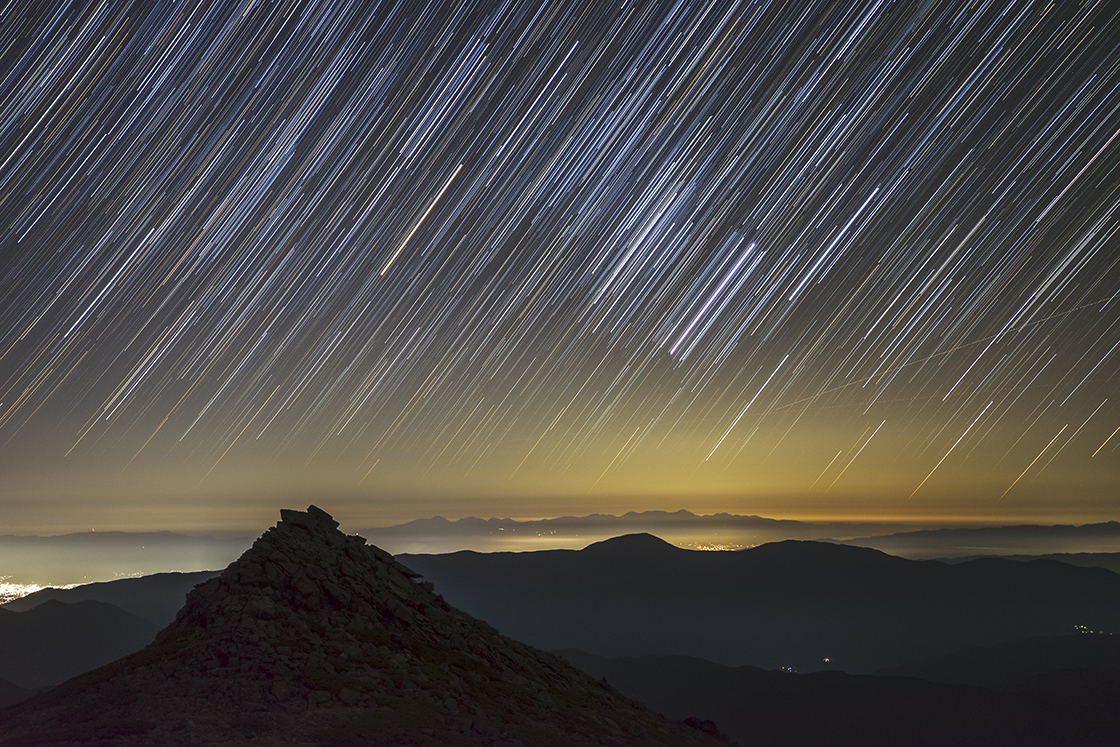
Here is a shot of the light trail of Orion rising taken with the GR IIIx after taking comparison shots with the GR III. Orion is the king of the constellations, with its bright stars, and thanks to the GR IIIx's strong low-pass selector, Betelgeuse's distinctive color came out well.
In both photos, I limited the shooting time to around 20 minutes to avoid too many light trails due to the dark location. Although it is not so visible when resized for the web, the movement of the stars in the sky from east to south to west at a 40mm angle of view is more noticeable here. If you look carefully, you may see that the light trails are a bit choppy. The GR IIIx's interval compositing function, like the GR III, allows for less than one second between shots, but the choppy lights are unavoidable in the current situation because the longer the focal length, the greater movement of the stars is. In case of 20-minute light trail shots in a dark place, you might want to use the bulb timer.
I made up my mind to use interval compositing with GR IIIx and GR III in urban areas. Just like I showed you the relationship between constellations and the 40mm, and I'd like to do that with star trails as well. I hope you too will try various types of starry sky photography by yourself.
(KA-TSU)


